Reading Rivers – Hydrology 101
Subscribe to our YouTube channel here:
Introduction
Text and diagrams by BRR Instructor Jamie Orfald-Clarke
At first glance, whitewater can seem chaotic, dynamic, and unpredictable – but by developing an understanding of how water moves, rapids can be broken down into a series of repeating patterns. Hydrology (the science of movement of water), helps us to understand the rules that generate these patterns. This allows us to see the static features within this dynamic environment and to understand how a swimmer or a boat will interact with currents and features so we can work with the water during our rescues.
Whitewater Terminology
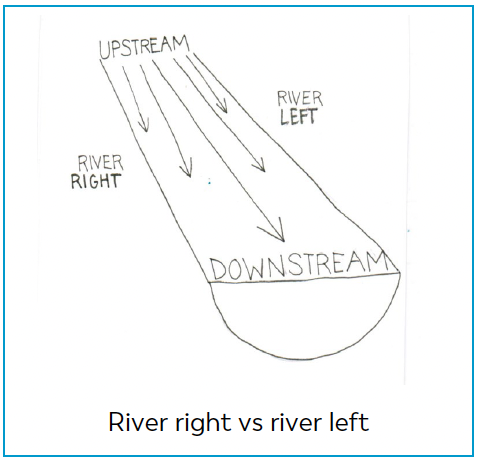
Hydrology helps us communicate on the river using common language to describe features. One important convention that has come from understanding the river hydrology is using the terms river left and river right when describing directions on the river. These terms come from the point of view of someone looking downstream. That means that for someone looking upstream, river right will be on their left, and river left on their right. You will find the terms river left and river right not only throughout this guide, but as universal terminology used by paddlers around the world.
ng
River features
Current in a straight channel
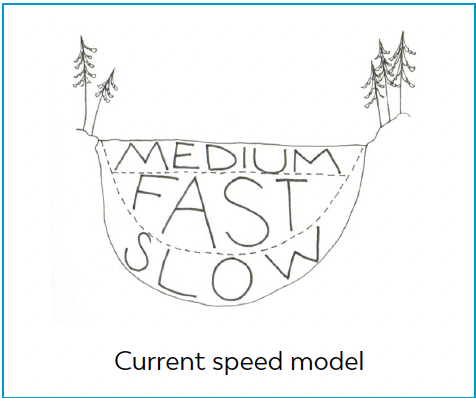
Rivers are the result of gravity causing water to flow downhill. How a river does this depends on the shape of the river bed. The current speed is faster where the river bed is steeper. The steepness of the river is called gradient. In a straight channel with no obstructions, the water lows in mostly straight lines and the surface is smooth and dark: this is called laminar flow. The current is fastest in the centre of the river and slower along the banks because friction with the bank of the river slows the water down. This friction also causes the current to be slowest along the bottom of the river. The surface of the water has friction with the air and is slightly slower than the current just below the surface where the water move fastest.
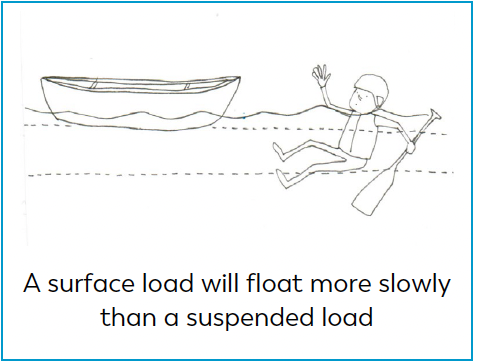
Understanding how the current’s speed varies will help you predict how objects floating at different depths will move in the river. An upright boat, which floats right at the surface of the water is a surface load. A swimmer floats lower and is a suspended load, while objects on the bottom of the river are bottom loads. These are important distinctions when applied to the current speed model (described in the previous paragraph). The boat floating on the surface will float more slowly than a swimmer in the suspended layer.
What creates a rapid?
Some rivers, like the Mackenzie River in the Northwest Territories, have sections with a continuous current of up to 15km/h without any rapids; the surface of the water is smooth and flat. Rapids aren’t formed by gradient alone, but are found when a change in gradient or a change in direction of the current disrupts the straight, smooth laminar flow. Understanding how these changes cause each of the features found in a set of rapids is an essential part of being able to see order instead of chaos in whitewater.
River bends
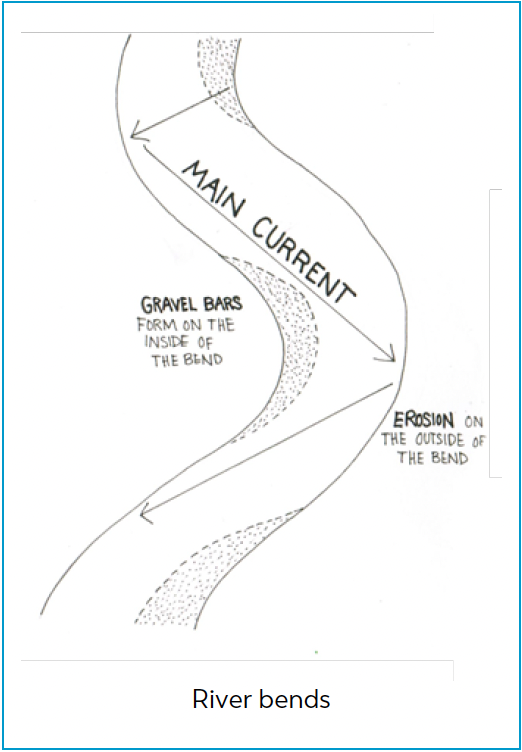
Water continues to flow in straight lines until it hits an obstruction. This means that at the beginning of a bend in the river, most of the current will hit the shore on the outside of the bend and bounce off. The result is that the current is faster and deeper along the outside of the bend but is slower along the inside of the bend. The outside of the bend will gradually erode and the sediment will travel downstream, accumulating on the inside of the next bend, often leaving a sand or gravel bank.
Water reading
In a river, multiple current lines exist, and at a bend the lines of current are not parallel to the shoreline. Water reading, another name for hydrology, is about learning the language of the river, written in the colours and textures of different currents and features. In practice, learning to read these current lines involves spending time by the side of the river watching it. Find a patch of water somewhere in the river and try to follow it with your eyes to see the direction and speed of the current at that point in the river.
Eddies
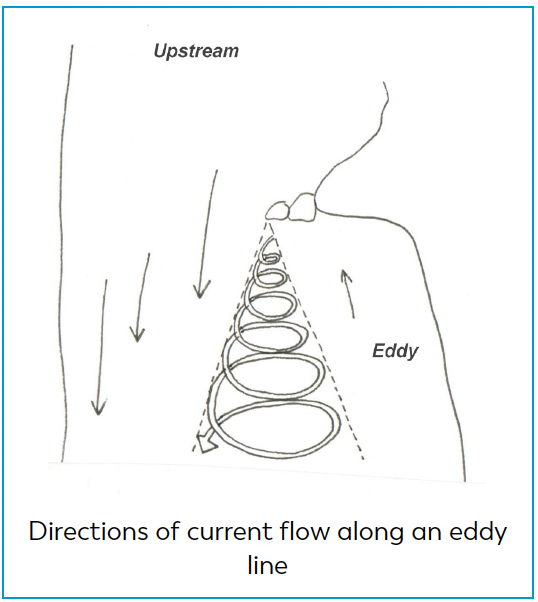
Water can’t flow through an obstacle like an exposed rock and is instead deflected away. This leaves a vacuum on the downstream side of the rock. Water, seeking to form a level surface, flows into this vacuum, forming a pool of water with no downstream current which is called an eddy. Depending on the speed of the current and the shape of the rock, the eddy could be a calm pool, or may have a strong upstream current with turbulent water in and around the eddy. Eddies are essential tools for anyone on the river: they are entry and exit points for swimming and boat manoeuvres, can be used to stop downstream travel, and to aid with upstream travel or river crossings.
At the border between the current and the eddy there is a downstream current on one side and an upstream eddy current on the other side. The friction between these opposing flows creates a zone of turbulent, aerated water, which is called the eddy line. As opposed to the smooth, dark, laminar flow, the water along the eddy line moves in more of a corkscrew shape and is called helical flow. At the upstream end of the eddy, the zone of helical flow is quite narrow but downstream it gets wider and less defined, so it is more accurate to think of it as an eddy wedge.
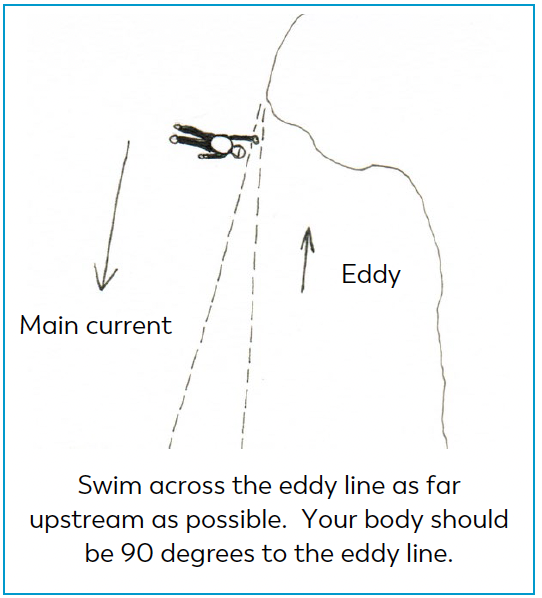
Whether in a boat or as a swimmer, the aerated water and confused current lines can make it challenging to cross this turbulent zone without getting spun around or pulled under water. To cross into an eddy as quickly as possible, your boat or body should be perpendicular to the eddy line and as far upstream as possible where the wedge is narrowest.
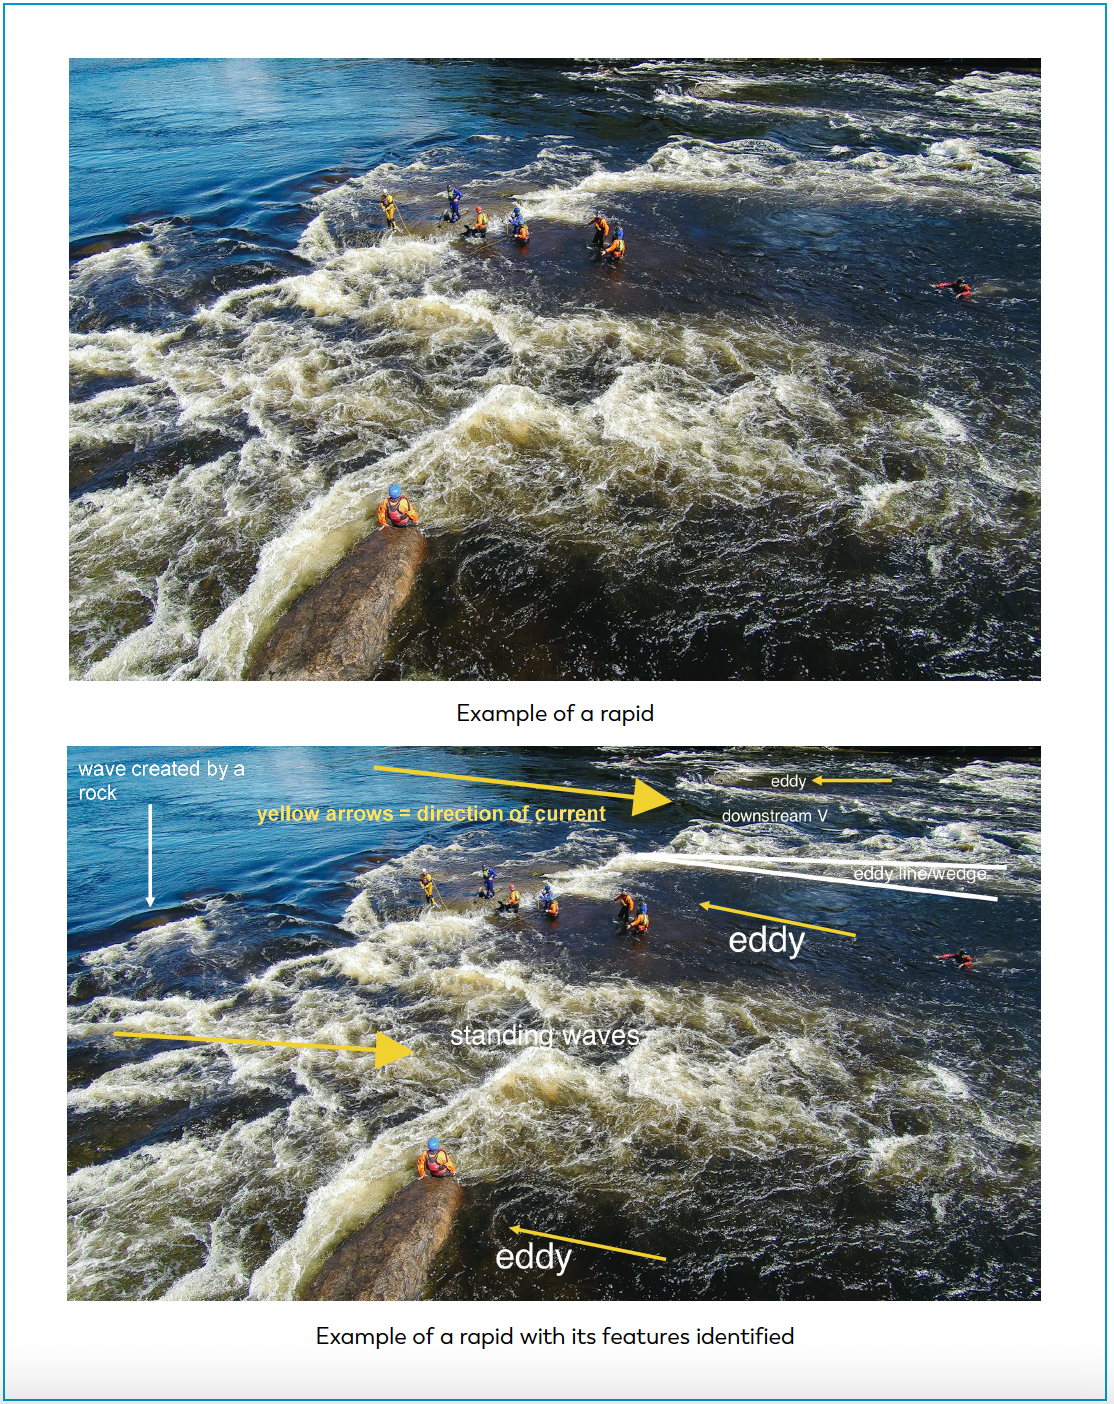
Downstream V
When the gradient of the river bed increases, the current speeds up and stretches out into a smooth, dark tongue of water. If this steeper section passes between two obstacles, the current deflected by each obstacle forms a diagonal wave (called a reactionary), which crosses the smooth water of the tongue. The two reactionaries meet to form a V shape with its point downstream. A downstream V is like an arrow pointing out the deep-water channel.
Standing waves
Standing waves are pressure waves found just downstream of the point of a downstream V. They are formed by the fast water in the V hitting slower water when the gradient decreases. This causes the water to pile up in a series of several evenly spaced waves of decreasing size, called a wave train. Just like the downstream V, standing waves indicated a deep-water channel and are usually a safe place for swimmers or boats. Some standing waves, however, can be quite large depending on the size and gradient of the river. Larger standing waves can swamp canoes, and really big ones can flip rafts or kayaks and they can be intimidating to swim through.
Waves created by rocks
When water flows over individual rocks, a wave is formed just downstream. The size and shape of the wave depends on the speed of the current and the amount of water flowing over the rock. Waves created by rocks can be found on their own or mixed in with wave trains. Look for waves that are out of place or are shaped differently from the ones around them. Note that if one of the waves in the wave train is different from the rest, the rock will actually be found one wave upstream of that wave.
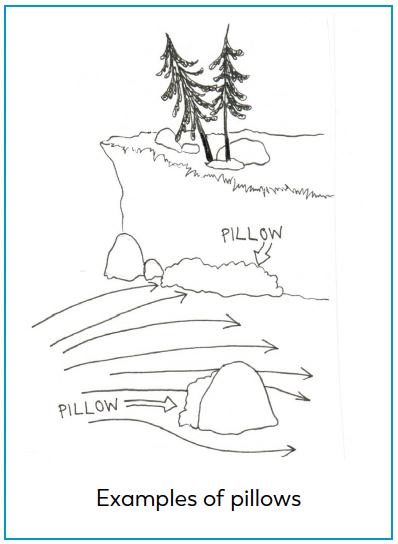
Pillow
On the upstream side of a rock, the force of the current causes a mound of water to build up before being deflected. This can be seen on boulders or where the current hits a cliff wall.
Big water features
In high volume rivers, instead of the features being defined by water deflecting off rocks and the banks of the river, many features are formed by currents colliding with each other, causing more chaotic helical flow. Along eddy lines and where currents converge, boils can be found where water rises to the surface, and whirlpools where water is drawn beneath the surface. Waves surge, cycling form standing wave to crashing wave and back.
Holes
A hole, or hydraulic, is formed where water flows over a ledge or a large rock. The sudden loss of elevation leaves a void, causing water to recirculate upstream to fill it. Holes come in many shapes and sizes and some are just the right shape to catch a surf in a kayak, canoe, or raft, while others, known as keepers, have the potential to recirculate swamped boats or swimmers indefinitely.
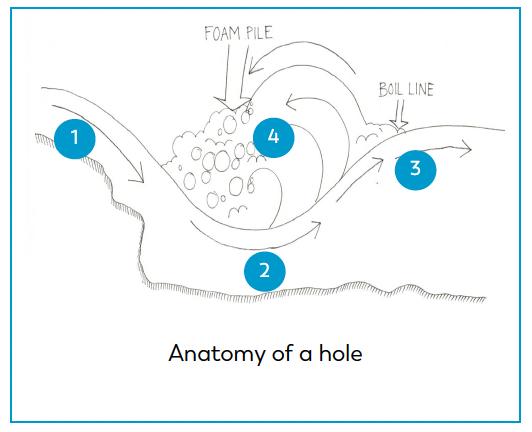
Anatomy of a hole
Holes can be broken down into 4 phases: down, out, up, and back. The phases can be differentiated by the colour of the water.
→ Phase 1 (the pourover): the water drops over the ledge and is smooth and dark
→ Phase 2: the water near the bottom of the river flows downstream
→ Phase 3 (the boil line): the water rises to the surface and looks like it is boiling. Just downstream of the boil line, the water flows away from the hole (making downstream of the boil line a good place to be if you want to get out).
→ Phase 4 (the foam pile): upstream of the boil line, the water recirculates towards the pourover. The white, aerated, turbulent water flowing back upstream is called the foam pile.
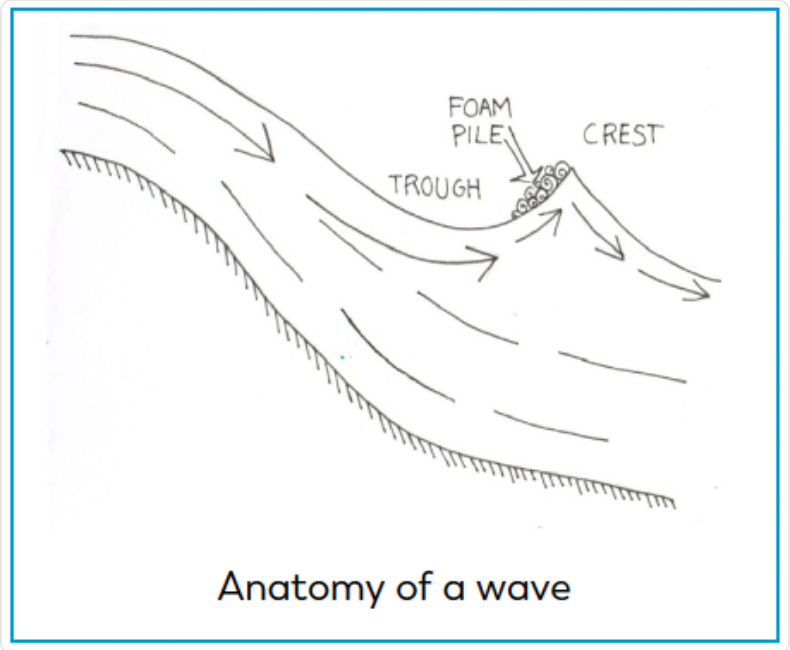
Wave or hole?
It can sometimes be difficult to distinguish between a crashing wave and a hole. One important difference is that in a hole, the current at and below the surface is recirculating upstream, while in a crashing wave, the water is all flowing downstream (except for the crashing part). This means that something that floats very well like an upright boat or a beach ball could stay surfing on a crashing wave but a swimmer should float right through. Remember that waves often become holes as water levels drop. Sometimes a feature won’t fit nicely into once category or another and can be called a wave-hole.
Recognizing dangerous holes
Several factors influence how retentive and dangerous a hole is. Some of the most violent, scariest looking holes won’t actually hold a swimmer for long, while others which look much more benign are impossible to swim out of without assistance. Two factors to look at to determine a hole’s retentiveness are:
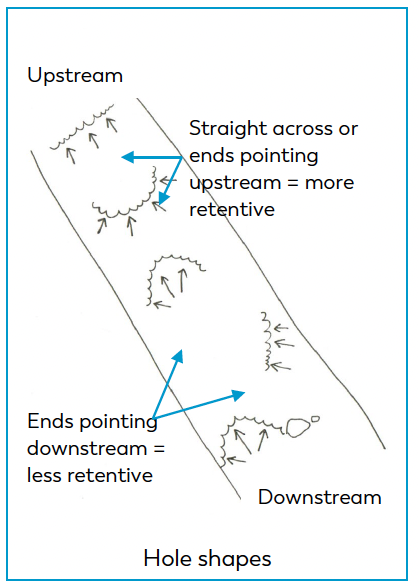
→ The shape of the hole corners point upstream of downstream)
→ How far is the boil line away from the pourover?
Self-rescuing from a hole
Two of the main options for swimming out of a hole are:
→ Swim to a corner
→ Swim out ‘the bottom’
To decide if it will be possible to exit out the corner of the hold, consider the shape of the ledge from a bird’s eye view. Holes with ends pointing upstream are generally more dangerous: they ‘kick’ towards the centre, making it hard to get to the corners. Holes with ends pointing downstream are easier to escape from: they tend to push a swimmer or boat to either side. An angled hold will kick to whichever side is downstream.
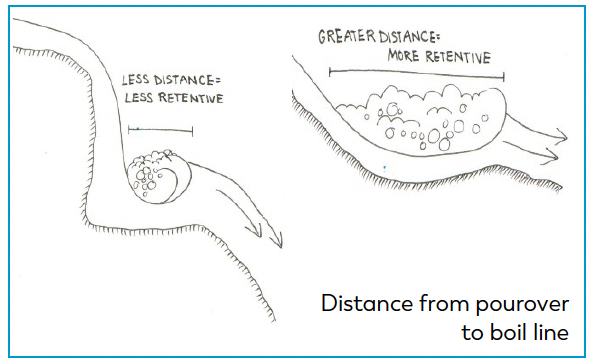
In some cases, one or both corners of a hole may be blocked off by a steep shoreline or rocks which could make it impossible to exit from the sides. A swimmer may be able to exit by catching the deep-water current and trying to resurface downstream of the boil line. The greater the distance from the pourover to the boil line, the more difficult this becomes.
It is also important to look at changes in the shape of a hole. Differences in the shape of the rock ledge mean that in some parts of the hole the boil line will be further downstream, while other parts will have a smaller foam pile, or even a downstream V separating the hole in two. Look for these weak spots as exit points.
Lowhead dams
Lowhead dams are concrete ledges built on rivers to control water levels. They create some of the most dangerous holes, sometimes described as “drowning machines”. At low water levels they are often safe, but at higher water levels all of the variables line up to create an extremely retentive hole. The sloping concrete ledge with a low gradient downstream result in a boil line very far downstream of the dam and with very high aeration in the foam pile. The concrete ledge has no imperfections to create weak points in the hole and it goes across the entire river.
Due to the size and nature of these dams, the holes often appear to be less dangerous than they are. Lowhead dams have been responsible not only for the deaths of many swimmers and boaters, but also of firefighters in failed rescue attempts. These failed rescues were one of the driving forces for the development of the first swiftwater rescue courses.

* For a demo of how lowhead dams work, watch from minute 04:30 to 06:15 on the following video: The Most Dangerous Dams
River hazards and dangerous features
Many of the features on a river can be a help or a hindrance, depending on the craft and situation. The features described in the coming paragraphs, however, are always dangerous and should be avoided in all cases. When performing a rescue or transport near or upstream of one of these features, ask the question “is there a chance someone might float into it?” If there is, stop and adjust downstream safety or planned manoeuvres to eliminate that chance.
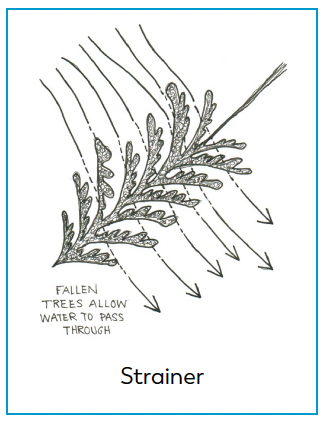
Strainers and wood
Much as your kitchen strainer works to separate water and spaghetti, a strainer is a tree or log in the river that allows water to pass through, while catching people, gear, or boats. Whereas a rock will deflect the current around it, water passes through the branches and under the trunk of a tree causing anyone floating towards a strainer to be pushed into it, likely getting caught in the branches and entrapped. Rescue or self-rescue from a strainer is difficult and dangerous. Even a fairly benign looking strainer in mild current could be fatal to a swimmer. Strainers should always be treated with respect and avoided.
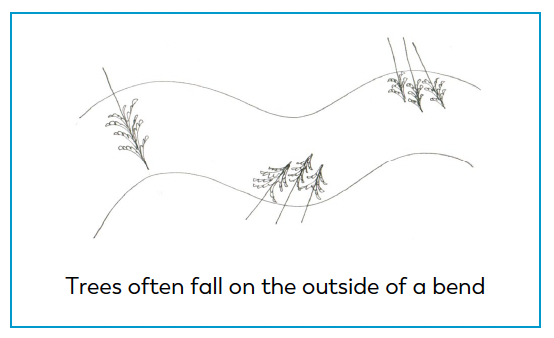
Trees often fall into the water on the outside of a bend, where the bank has eroded, so sharp bends should always be approached with caution (see river bends above). The process of erosion in ongoing, so whether or not you have run a particular river before, it is important to scout blind corners and horizon lines. In cold climates, the spring thaw will often wash new wood into rivers. Strainers also occur in areas that are prone to rapid water level changes due to rainfall. During high water, logs may be floating down the river and as the water drops, they may be found floating in eddies, or caught on rocks. Other objects can also act as strainers; a pinned canoe or raft with straps or packs in it, or anything from guardrails to cars in a flood situation can cause entrapment.
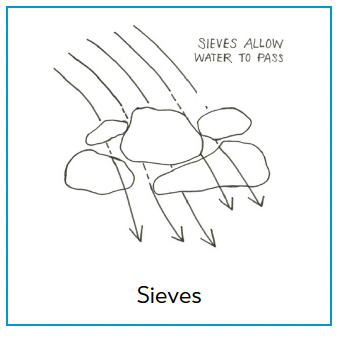
Rock sieves
Boulders sometimes pile up in a way that allows water to pass through the spaces between them. This creates a rock sieve, which acts like a strainer. A similar feature can also be created when erosion carves a tunnel through bedrock. To determine how dangerous a rock sieve is, look at the current flowing towards the jumble of rocks, and the water immediately downstream. If the current is being deflected, and there is an eddy or relatively calm water just downstream, it is likely safe. If there seems to be a lot of water flowing out from the downstream side, stay away!
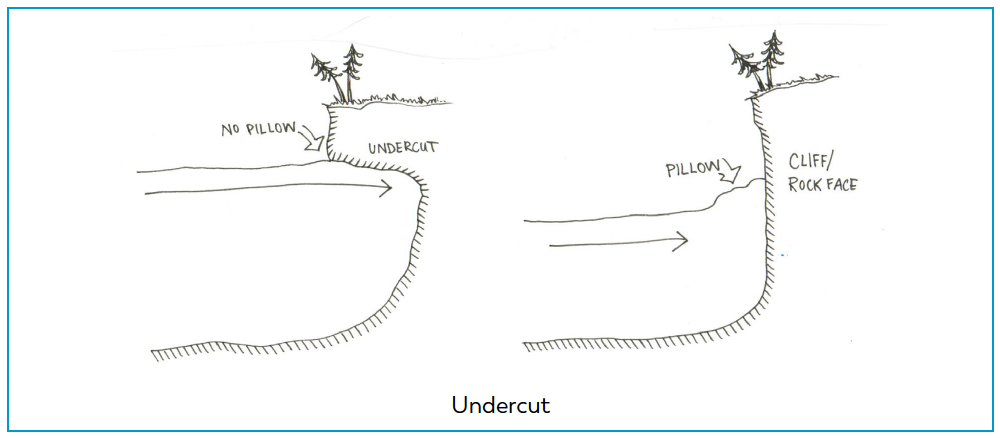
Undercuts
An undercut is a feature that occurs when water flows into a cave under the riverbank or the sloping side of a boulder or bedrock. If a swimmer gets pushed into an undercut, they could become entrapped or pinned underwater by the force of the current. Undercuts can be very dangerous since the caves can be entirely under the surface of the water, making it more difficult to identify undercuts than strainers.
One way to check for undercuts is to look for a pillow where the current flows into a rock face or boulder. If the rock is solid, water should be pillowing up against it and deflecting off. When water is flowing towards a rock feature and disappearing instead of getting deflected, that is a sign of an undercut. Keep in mind, however, that it is possible to have a pillow and an undercut together. The only way to be certain that there is no undercut is to see the feature at much lower water levels. Certain rock types, such as limestone or other sedimentary bedrock are more prone to these features.
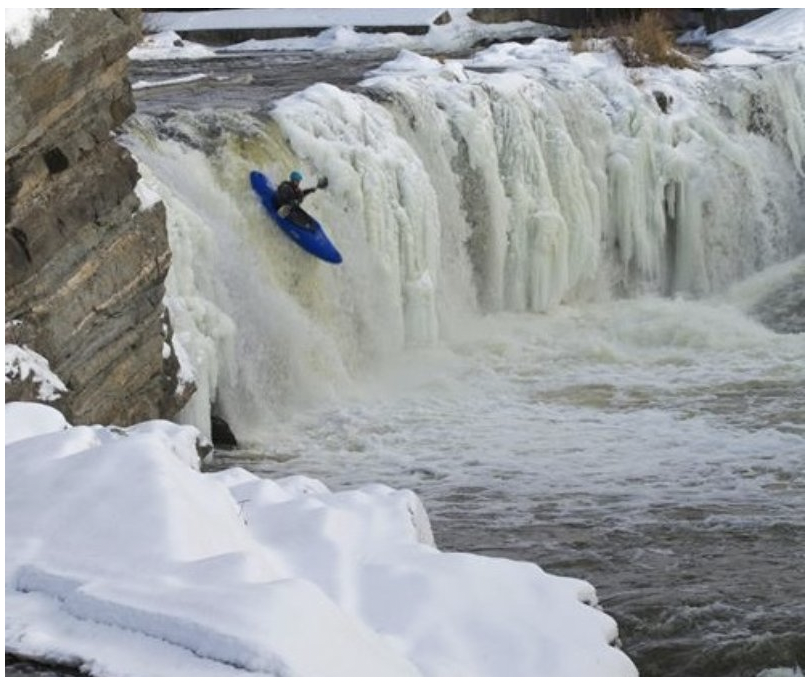
Ice
In cold climates, ice forms first on (and leaves last from) flatwater sections of rivers, and rapids freeze much later, if at all. This means that an open rapid may end by flowing under a sheet of ice, which is like a never-ending, river-wide undercut. When there is ice present, never enter a rapid without first scouting down to flatwater below. Some paddlers choose to paddle upstream of ice. This is like rock climbing without a rope – there is no margin for error.
Ice buildup along the shore can also create an undercut, or ice chunks can become dislodged during spring breakup. Shoulder season and winter paddling or rescues should always be approached with added caution.
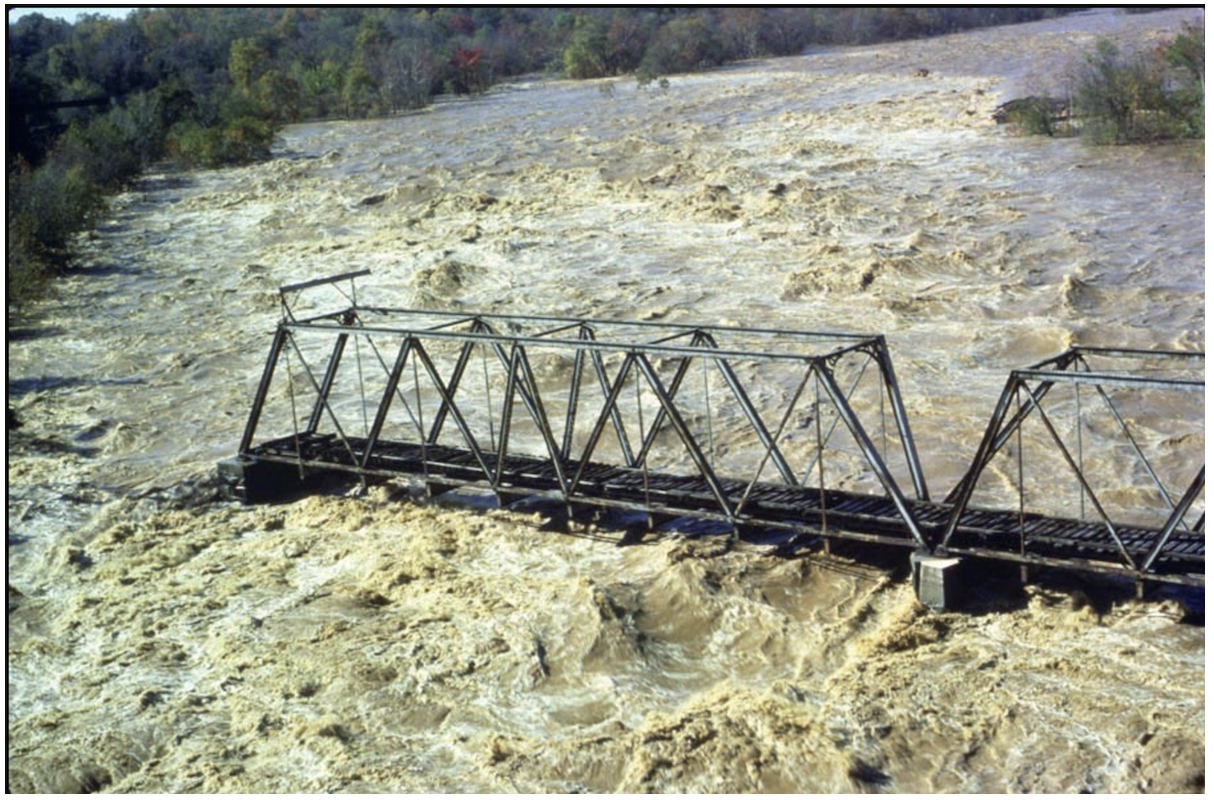
Flooding
Rivers are considered to be at flood stage when the water overflows the high-water mark on the banks. At flood stage, hazards include water flowing through the trees, active erosion, boulders rolling down rapids, and wood floating down the river. Rivers are also more continuous when in flood, and portage take-outs may not be accessible. All this is to say: rivers in flood become unpredictable and rescues can be difficult and dangerous.
Human made infrastructure in rivers
Some of the most dangerous features found in rivers are the by-products of human development. Human structures tend to be uniform and exact in a way that never occurs in nature, as in lowhead dams, or concrete floodways. These create features like river wide holes and banks with no eddies or slack water. There are also places where surface water flows into tunnels, and may be blocked by grates. In other cases, dams are removed, leaving behind rebar or blasted rock which is sharper than anything naturally occurring. Always be extremely cautious when there are signs of past or present development. Padding
Decision-making in whitewater
Scouting rapids
Before entering a rapid, whether in a boat or as a swimmer, it is important to take a look at it and see what you’re in for. One way to scout is to walk the shoreline and look at each section of the rapid. Scout from the bottom up by heading directly to the first good-sized pool below the rapid, to see where boats, gear, and people will end up. If the rapid ends with a dangerous feature, you might choose to skip the rest of the scouting and look for a portage trail, whereas if the rapid starts with a dangerous feature, it may be possible to just portage that one section.
From the bottom, move up the rapid looking for hazards, route options, and landmarks, and thinking about how each section connects to the rest of the rapid. Think of scouting a rapid like looking at a map before driving somewhere; you have a great overview but need to put the map away before you get in the water. Instead of trying to memorize the whole rapid, focus on the landmarks you’ll need to look for to get where you want to go.
On downriver trips, experienced paddlers often boat scout sections by taking a look down the next section of rapids as they float towards it and making a quick decision whether or not to continue. Boat scouting depends on the ability to quickly read the water and the ability to quickly change course and get into an eddy. Competent paddlers can eddy hop by boat scouting a route to the next eddy, and then boat scouting the next move from that eddy.
Horizon lines
When boat scouting a steep section of river, or a sudden drop, it might not be possible to see the rapids below. From that vantage point, only a horizon line will be visible; the water will disappear over the drop, and out of sight. If the water is moving slowly above this point, it may be possible to get close enough to see the rapid, while still having the option of retreating upstream and heading to shore. People in canoes or rafts will often stand up to get a better vantage point. If it is not possible to see over the brink, it is a blind drop. Paddlers of all experience levels are encouraged to scout blind drops from shore, even on a familiar river, since new strainers can fall into the river at any time.
International river classification system
The current version of the international classification system was developed by the American Whitewater Association to create a framework for ordering the difficulty of rapids by giving each rapid or section of river a rating from 1 to 6. It is important to note that this is a subjective rating system, and an attempt to convey many factors with only one number. Classifications are often indexed to water level, but might not account for factors like remoteness, water temperature, or the type of craft being paddled.
Using the classification system
One effective way to use the system is to think of it as the starting point for a conversation. You can start out by saying “the Upper Dandelion is a Class III-IV run with one class V at the end”. Here are some good questions you could ask:
→ What other runs have a similar feel or difficulty?
→ How continuous is it?
→ How easy is it to scout rapids, and to walk around harder rapids?
→ Is it a big water river or a steep creek?
→ Is it likely to have ice or new strainers at this time of year?
Objective and subjective hazards
The classification system deals with objective hazards; these are the risk factors independent of the people on the river. The above questions are examples of objective hazards. Subjective hazards, on the other hand, are those factors dependent on the individuals on the river and their functioning as a group. Here are some examples of subjective hazards:
→ Swimming abilities
→ Rescue competence of group members
→ Paddling competence of group members
→ Group dynamics
→ Energy levels
While none of the subjective hazards affect the classification of a river or rapid, they all have an effect on the consequences of something going wrong and should be part of the conversation when planning a trip or scouting a rapid.
Class I Rapids:
Fast-moving water with riffles and small waves. Few obstructions, all obvious and easily missed with little training. The risk to swimmers is slight; self-rescue is easy
Class II rapids — Novice:
Straightforward rapids with wide, clear channels that are evident without scouting. Occasional maneuvering may be required, but rocks and medium-sized waves are easily missed by trained paddlers. Swimmers are seldom injured and group assistance, while helpful, is seldom needed. Rapids that are at the upper end of this difficulty range are designated “Class II+”
Class III rapids — Intermediate:
Rapids with moderate, irregular waves that may be difficult to avoid and could swamp an open canoe. Complex maneuvers in fast current and good boat control in tight passages or around ledges are often required; large waves or strainers may be present but are easily avoided. Strong eddies and powerful current effects can be found, particularly on large-volume rivers.
Scouting is advisable for inexperienced parties. Injuries while swimming are rare; self-rescue is usually easy, but group assistance may be required to avoid long swims. Rapids that are at the lower or upper end of this difficulty range are designated “Class III-” or “Class III+” respectively.
Class IV rapids — Advanced:
Intense, powerful but predictable rapids requiring precise boat handling in turbulent water. Depending on the character of the river, it may feature large, unavoidable waves and holes or constricted passages demanding fast maneuvers under pressure. A fast, reliable eddy turn may be needed to initiate maneuvers, scout rapids, or rest. Rapids may require “must make” moves above dangerous hazards. Scouting may be necessary the first time down. Risk of injury to swimmers is moderate to high, and water conditions may make self-rescue difficult. Group assistance for rescue is often essential and requires practiced skills. A strong roll is highly recommended. Rapids that are at the lower or upper end of this difficulty range are designated “Class IV-” or “Class IV+” respectively.
Class V rapids — Expert:
Extremely long, obstructed, or very violent rapids which expose a paddler to added risk. Drops may contain large, unavoidable waves and holes, or steep, congested chutes with complex, demanding routes. Rapids may continue for long distances between pools, demanding a high level of fitness. What eddies exist may be small, turbulent, or difficult to reach. At the high end of the scale, several of these factors may be combined. Scouting is recommended by may be difficult. Swims are dangerous, and rescue is often difficult even for experts.
A very reliable Eskimo roll, proper equipment, extensive experience, and practiced rescue skills are essential. Because of the large range of difficulty that exists beyond Class IV, Class V is an open-ended, multiple-level scale designated by class 5.0, 5.1, 5.2, etc. Each of these levels is an order of magnitude more difficult than the last. For example, increasing difficulty from Class 5.0 to Class 5.1 is a similar order of magnitude as increasing from Class IV to Class V.
Class VI rapids — Extreme and exploratory:
These runs have almost never been attempted and often exemplify the extremes of difficulty, unpredictability, and danger. The consequences of errors are very severe and rescue may be impossible. For teams of experts only, at favourable water levels, after close personal inspection and taking all precautions. After a Class VI has been run many times, its rating may be changed to an appropriate Class 5.x rating.
Water levels & river volume
The classification and nature of a river can change drastically at different water levels. Some rapids become much more challenging and have higher consequences, while other rapids disappear completely. The simplest way to measure changing water levels is to use a height gauge. This could simply mean checking whether a certain rock is sticking out of the water, or it could involve installing a gauge with evenly spaced numbers.
Water levels can also be measured by flow rates, expressed either in cubic metres per second (CMS) or cubic feet per second (CFS). This is a measurement of the volume of water that passes a point in the river each second:
Flow rate = river width x average depth x current speed
A third and less common way that water levels are measured is hydroelectric output. This might be recorded on a river with a hydroelectric dam, and is a measurement of power output (kilowatts or megawatts). The hydroelectric output of a river is proportional to the flow rate.
Any of these water level measurements is of limited use without other information and they are mostly used as a comparative tool. Commercial operations and recreational paddlers often record the water level each time they run a particular river. There are also online resources that compile water level data for many rivers. These will usually include a classification and description of the river, as well as minimum and maximum flow for the river.
Further Reading:
Aritcle: How to self-rescue if you fall through ice
Article: Solo roll onto tarp and pad